Tuesday 18 December 2012

Boys Underwear

I recently went on a bit of an underwear making spree, after  successfully trying out the That Darn Kat undies pattern. They are fantastically cute children's underwear that use only small amounts of knit fabric, and are elastic-less. The boys style also features a functioning y-front.

TDK Undies
These sewed up quite quickly, and the only slightly tricky bit was sewing the leg bands on the smaller sized ones, as the freearm on my machine made it a bit of a tight fit.

The only change I made to the pattern was to attach the leg bands like a binding that wrapped around the leg holes rather than the flip and top-stitch method used on the waistband. To me this made them look more like undies and less like training pants.

My son somewhat logically couldn't fathom the purpose of a y-front for his 4 year old self, so a couple of his pairs have a non functioning  front piece.


After a friend saw the first pair I made, she asked if I could make some for her son too. He had very definite colour and pattern preferences, so the finished collection had a bit of a multi-pack look to it.


I really recommend this pattern, and will definitely be making more of them with my younger son about to start toilet training.

Tuesday 11 December 2012

Christmas Ornament Swap 2012


A few months ago, I signed up to the New Zealand Handmade Christmas Ornament Swap. The basic premise is you are assigned a swap partner, for whom you make one Christmas ornament and a card.

This sounded like a fun activity to take part in, in the lead up to Christmas so I signed up.

The ornament I made was a ribbon pine cone. These are fairly simple and quick to make - using sequin pins, you attach rows of folded ribbon to a polystyrene egg.


They can look quite effective if you group several together in a bowl or dish for a table centerpiece, particularly if you use coordinating ribbon colours. (Not like the ones above!)

I was assigned Gillian of Mudbird Ceramics as my swap partner, so I packaged up my pinecone and card and posted it off to her.


The very next day, I received a package from Gillian, and was delighted to discover a lovely wee ceramic dove and card featuring one of her other designs. Thanks, Gillian!


This has been a great experience to take part in, and I'm sure I'll be playing along again next Christmas.

Sunday 18 November 2012

Perfectly Preppy Skort

Also for my niece's birthday I made a skort from the Perfectly Preppy Skirt/Skort pattern by the Scientific Seamstress. I made her one of these for her last birthday, which she wore at every opportunity.


After consulting with my sister (her Mum), it was determined that her current favourite things are butterflies and the colour purple. With this insight, I went fabric shopping for inspiration, and found what I hope will be a hit.


The main fabric is a quilting cotton with an interesting texture to it, and the lining and shorts are made from a poly cotton poplin. Because the purple is quite dark, I matched the shorts to the pink in the main fabric for a bit of contrast. My only variation from the pattern instructions was to use adjustable buttonhole elastic in the back waistband.


I again opted to make the version with the full circle skirt, as this is a great summer style. Something I'm really pleased about with this version is that the weight of the quilting cotton makes it drape really nicely.

You can see my previous version of this pattern here.

Wednesday 14 November 2012

Red Riding Hood Cape

I recently dipped into my copy of Little Things to Sew again, for a great wee present for my niece's 3rd birthday. I chose to make the Red Riding Hood Cape as pictured on the front cover.


I found some fantastic red cotton corduroy for the main fabric, and some matching quilting cotton for the lining. I also chose a fun wee button to hold it closed.


As always, the sewing instructions are excellent and result in a really nice finish with all the seams completely enclosed. I completed the sewing for this at my monthly sewing group, and the ladies were suitably impressed.


This will be suitable as a lightweight topper in cooler weather, or as a dress-up costume component - will have to see what the whims of a 3 year old decide!

Saturday 10 November 2012

Skirt Bag

After my previous bag was getting a bit untidy looking, I decided to make myself a new bag. I prefer a cross body style and the Michelle Patterns Skirt Bag was just what I was after.


After some too-ing and fro-ing on fabric choice, I chose a cotton drill with a vintage cotton reel print that I found at Spotlight. The lining is in a matching purple colour.


As always, the instructions in the Michelle Patterns are clear and well thought out, and produce a tidy end product.
There are included a few different ways to finish the inside pockets - either leave as one large pocket, or include pen slots and a smaller pocket. I did one of each, but would break up the larger pocket next time as it flops open a bit.


I'm really pleased with how it turned out, and it has generated some positive comments from people who have seen me wearing it.

Sunday 28 October 2012

Wiksten Tova

When I came across the Wiksten Tova shirt pattern a while ago, I was smitten. It looked to be a comfy lightweight shirt with possibilities.


I duly ordered the pattern, and stuck it together, and then got a bit stuck on how I might do an FBA on it. With the large yoked front, which finishes at the bust line it was proving a bit of a puzzle on how to add extra space without ruining the features of it I liked so much.

Off to Pattern Review for some advice, and I struck it lucky. The designer, Jenny, popped in and told me exactly how to do it, or at least how she had designed it to be done. Excellent!

I duly adjusted and made up the pattern in some cotton I had kicking around. 


Overall, the fit was good, but the back seemed a little loose, so I added in a couple of fisheye darts at the back waist and it was much better. 
Now I will say right now, the fabric was a little too crisp for this style, so suspect that with a more appropriate fabric the back darts would not be needed.

The instructions were overall pretty good, and made for a nice shirt at the end. I am really pleased with how the yoke came out.


Unfortunately, I managed to pick a fabric that is completely impossible to photograph. The details all get lost in the fabric pattern. 

NOTE TO SELF: Pick a fabric with more drape and less pattern!

Saturday 6 October 2012

More Bucket Hats

As we are coming into Summer again here, I decided it was time for some more sunhats at our place. Fortunately, I came across a hat sew along here, and decided it was just the motivation I needed.


I again used the Oliver and S bucket hat pattern from the 'Little Things to Sew' book. You can find this pattern for free here.


The first one is made from left over cotton drill, from the Superhero cape made previously.
The second (and third) one is made from some leftover rip stop cotton, from a pair of pants.


All of them have plain black cotton drill as their reverse side.

A great hat pattern, that I've made previously, and will continue to use.

Monday 17 September 2012

Colette Sorbetto

Pattern Description: ultra-simple and swingy little top! With its ultra simple construction, elegant loose cut shaped with bust darts, and the box pleat detail down the front, this is a pattern you can throw together in a huge range of fabrics for summer.

Pattern Sizing: 0 - 18

Did it look like the photo/drawing on the pattern envelope once you were done sewing with it? This version doesn't quite look the original, due to a minor design change.

Were the instructions easy to follow? Super easy!

What did you particularly like or dislike about the pattern? I have now made this pattern up three times, with plans for at least one more. You can make quite small changes, that give a completely different look

Fabric Used: This floral fabric is a mystery length that has been lurking in my sewing box for several years. No real idea what it is, but it drapes nicely!


Pattern alterations or any design changes you made: On this make, I did the front pleat as an inverted pleat, rather than a box pleat.
On previous makes, I've done the neck and arm bindings to the inside, and another version with an inverted pleat.
I also lengthened it by 2".

Would you sew it again? Would you recommend it to others? Yes, I have plans to make at least one more of these, as they are easy to make, and easy to wear!

A great wee top, with lots of design possibilities.


Thursday 13 September 2012

Burda 9793 - Boys Shorts

I recently made up view C of Burda 9793 - boys shorts. Twice, just for good measure.

The first ones were in a grey/blue/green skate fabric, a cotton drill which had been hiding in the bottom of my fabric bin for a while. I opted to make the pocket bags from some matching poplin to reduce bulk, which in the end was not necessary.

I

My only issue with this pattern was the instructions for the faux fly. For some reason, I just couldn't figure out what they were trying to explain, so ended up just stitching it down.


The second pair was made out of a cotton drill also, green with white stars. The exciting part of these was that I made them completely on my Singer 201, straight stitch machine!


The second pair are french seamed throughout, and then topstitched  for mock felled seams.


Perhaps a lot of work for a pair of boys rough and tumble shorts, but they look nice and they served the aim of me getting to grips with my new old sewing machine.

I will definitely be making these again (and again...) as they are quick and easy and look great, and plan to make the longer pants too when the weather starts cooling off again next autumn.

Tuesday 11 September 2012

Vogue 8626 Coat


Lined coats A, B, C in two lengths, A-line with or without collar, close fitting with princess seams, back pleats, long sleeves with elbow darts, and top stitching trim.


Pattern Sizing: (8 10 12 14)- (16 18 20 22 24) with pattern pieces for ABC&D cups.

Did it look like the photo/drawing on the pattern envelope once you were done sewing with it? Yes, I think the drawing was fairly accurate.


What did you particularly like or dislike about the pattern? It went together easily with no particular issues.
The sleeves as drafted are tiny. I spent quite a bit of time redrafting them, and I'm still not sure they are exactly how I want them.

I muslined this coat twice before I cut into my wool, as I was a bit iffy on the sizing. 
Looking at previous reviews, it looked HUGE, so I tried a size down from my usual, which fit fine for a dress coat, but was going to be a bit tight made up in the wool. 
I re-muslined in my usual size, with the re-drafted sleeve and that was much better! 
I think it is the deep pleat in the back that makes it look quite billowy.


Fabric Used: A grey wool coating, with a blue, grey and burgundy patterned lining which was silk (I think?!)
The coating was lovely to work with, and sewed together beautifully.
The lining was a complete pain - fraying, slipping .... aaaagh!! It looked pretty though 


I liked the idea of the knee length coat, but was a bit concerned it would swamp me, as I am only 5'2". I originally muslined the shorter length, but didn't like it, so ended up with something in the middle which was 3" shorter than the longer view (or 3" longer than the short view)
As mentioned above the sleeves were tiny - so I redrafted them as a 2 piece sleeve to add the extra width.
I sewed down the insides of the back pleat to hold the pleat and also try to stop the billowy back.

I lined up the smaller side pleats with the princess seams in the back by making them tiny box pleats.


I attached smaller buttons on the inside of the coat behind the larger buttons to stop the thread pulling on the coat when I am buttoning it.


I probably won't sew it again, as I have other coat patterns I would like to try, but would definitely recommend it as a good pattern to start on.

Monday 28 May 2012

Children's Hoodie

I recently made a fleece hoodie for my son for Playcentre. I chose a fleece with rockets and planets as he has an interest in all things space.

I used the All the Rage Raglans pattern with optional hoodie from CarlaC, the ScientificSeamstress.
As I was using fleece rather than jersey, I did as recommended, and went up one size from his usual to a 5.


As always, the instructions were well written and left no room for confusion. The only change I made was to top stitch the raglan seams, and the hood seam.
Next time I plan to add extra seam allowance to the raglan seams so the topstitching works a bit better.

I was a little worried when it was finished, as it looked really long and narrow, but actually when he wears it, and lifts his hands up high it still covers his tummy - so we are calling that a design feature!


T is quite slim, so would suggest maybe going up a couple of sizes for the extra width through the body if this is not the case for your child.


Friday 27 April 2012

Style Arc Linda pants

After seeing the success that other people were having with the Style Arc Linda pants, I decided to see for myself what all the gushing was about. 

Style Arc is an independent pattern company from Australia, that designs RTW styles, with RTW fit. They also very helpfully include a sample of their recommended fabric with their patterns, so that you have an idea of the weight and stretch of the fabric they suggest if you want to substitute, or if their recommendation is a bit 'lost in translation'.

The Linda pant is a pull-on style most often seen here (and in Australia) made in bengaline, and that is the fabric recommended here.


To keep in the spirit of what was intended, and because frankly, I find them very comfortable, I made mine up in RPL* bengaline which I found on the clearance table at Spotlight for a slightly unbelievable $3 a metre.

The only alteration I made was to add 1cm to the front waist, as that is where my extra waist 'fluff' resides, and shortened them by 3 1/2 cm. For reference I started with a size 16.

Yes, I am standing on the side of my bath!

While I am reasonably happy with the fit, there is still something slightly hinky going on with my crotch seam, which I suspect has more to do with my fluffy tummy than the pattern.
As it is, I can't complain. These essentially fit straight out of the packet, and they are acceptable enough to wear out of the house, though if anyone has an idea on how I might improve the fit, I'm open to ideas.


Saturday 21 April 2012

Jalie 2911 Women's Pullovers

The next Jalie pattern I tried out was 2911, a pattern for Women's pullovers, either with or without a hood.


I made this up for my Mum's birthday, as she mentioned wanting a new lightweight sweater. I found a caramel coloured sweatshirting, that didn't look too heavy and gave it a try.


The instructions were again straightforward with the aid of the diagrams, and this went together easily. 
The only bit that was a bit difficult was getting the neck band in with no puckers. One of the previous reviewers on PR mentioned getting better results when she sewed from the centre back down toward the front, so I gave this a try and was happy with the result.

Not too puckery?!

I am really pleased with the finished result, and my Mum likes it too. I am planning to make one for myself, perhaps in fleece for the winter.

Tuesday 17 April 2012

Jalie 2794 Sweetheart Top

This was the first pattern I tried from Jalie, a Canadian pattern company, that I discovered through 
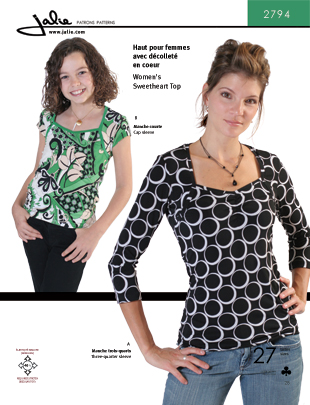
Pattern Review. I ordered a couple of different patterns, and decided to try this one first as it currently has 80+ reviews!

I chose a pink and black stripe synthetic, probably polyester, and used a black cotton/lycra for the bands around the neckline. I made a straight size Z, as Jalie recommend you choose your size based on your full bust measurement.
It went together easily, as the instructions while a bit sparse also include step by step diagrams which are very clear. The only change I made was to sew the sleeve hems before I did the seams, as the sleeve wouldn't fit around my free arm very well once sewn.
A good representation of the colour

Unfortunately the neck and shoulder area was quite loose, and I ended up having to wear a tank tee under it to cover my bra straps, and feel comfortable wearing it.
Also, having been through the wash just twice (in a lingerie bag), the black parts of the fabric unravelled and the top had big slits where the black had 'washed' out. It ended up in the bin, as there wasn't even any salvageable fabric left!


After going back to PR for advice I made another attempt, this time using a size X (my high bust measurement) through the shoulders and armscye, and then a size Z from armscye down. I also used a better fabric, this time an ITY knit, again with the cotton/lycra bands. Again I sewed the sleeve hems first, and I also stretched the elastic at the bust a little more to get a bit of extra gathering.


Overall, I am much happier with the fit of this version. The neckline sits against my chest better with no gaping, and no bra strap flashing. The smaller size resulted in the neckline being raised, and also the shoulder seams being closer together, essentially a smaller neckline 'square'.

So far, the top has gone through the wash with no signs of spontaneous combustion too.